
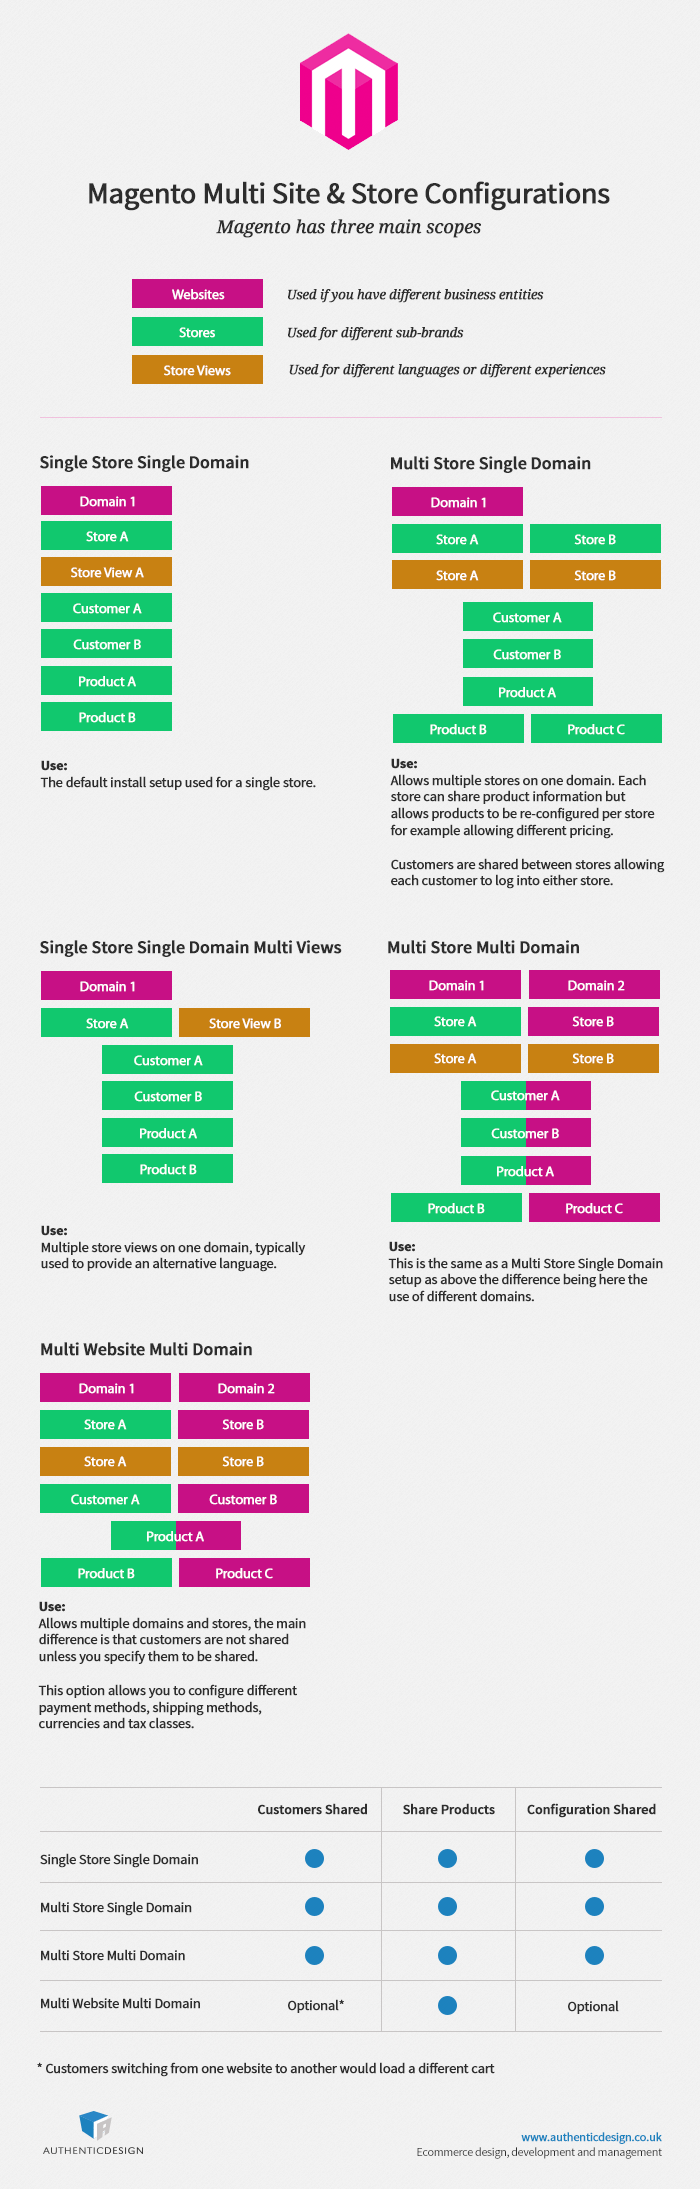
Magento’s multi site/store view configurations.
Magento’s multi site/store view configurations.
In this post I’m going to go through all the steps you need to make in order to extend the REST Api, there is very little documentation scattered around on this and I had to pull pieces together from various official sources, not only that but the responses Magento gives you can at times be confusing and does not really give you a hint to what the problem is, finally this is a full guide so no knowledge is assumed other than setting up the rest roles/users and assuming you have ssh access on the server.
This guide is split into two parts. Part 1 configuring REST access and Oauth setup, Part 2 extending the Api if you already have the api access and oauth configured correctly then skip to part 2.
Firstly set up your roles/users follow the guide on the Magento site
Install/Configure Oath
it’s likely you won’t have this set up on your server, this needs to be installed via PECL, if you do want to check that you don’t already have it, check phpinfo(); and see if you have these lines:

It’s important here to have curl in the Request engine support, if you don’t this means you need to install curl (apt-get install php5-curl) or oauth has not been installed correctly. If you do have it you can try upgrading
pecl upgrade oauth
or you may have to uninstall/reinstall if for example you didn’t have curl before installing oauth.
pecl uninstall oauth
There is another caveat with 1.2.3 of oauth and that is Magento uses the multi update HTTP_MULTI_STATUS with a 207 response code when you issue PUT requests to update multiple items. In this version of oauth it incorrectly gives Invalid/bad auth response when using this response code, to get around this you can compile your own version with a fix (the bug has been fixed in the latest SVN release).
If your not bothered about using the multi update via PUT then go ahead and install oauth
pecl install oauth
To compile your own version download it from the PECL site http://pecl.php.net/package/oauth
Replace oauth.c with the fixed version
Upload all the files into a directory, if you haven’t already then issue the following commands a line at a time: (replace extname with the directory your working with)
$ cd extname
$ phpize
$ ./configure
$ make
$ make install
This should now have installed the extension correctly, you can check by doing:
pecl info oauth
And by looking at the phpinfo(), ok so now oauth is configured correctly we can run some tests.
Create a directory in the root of your site, e.g /tests and create a file called customers.php place the following code below changing:
You can get the key and secret from System > Web Services > Oauth Consumers > Select the appropriate key you set up earlier.
<?php

require '../app/Mage.php'; //Path to Magento
Mage::app();

// $callbackUrl is a path to your file with OAuth authentication example for the Admin user
$callbackUrl = "http://mydomain.com/tests/customers.php";
$temporaryCredentialsRequestUrl = "http://mydomain.com/oauth/initiate?oauth_callback=" . urlencode($callbackUrl);
$adminAuthorizationUrl = 'http://mydomain.com/admin/oauth_authorize';
$accessTokenRequestUrl = 'http://mydomain.com/oauth/token';
$apiUrl = 'http://mydomain.com/api/rest';
$consumerKey = 'CONSUMER_KEY';
$consumerSecret = 'CONSUMER_SECRET';

session_start();
if (!isset($_GET['oauth_token']) && isset($_SESSION['state']) && $_SESSION['state'] == 1) {
 $_SESSION['state'] = 0;
}
try {
 $authType = ($_SESSION['state'] == 2) ? OAUTH_AUTH_TYPE_AUTHORIZATION : OAUTH_AUTH_TYPE_URI;
 $oauthClient = new OAuth($consumerKey, $consumerSecret, OAUTH_SIG_METHOD_HMACSHA1, $authType);
 $oauthClient->enableDebug();

if (!isset($_GET['oauth_token']) && !$_SESSION['state']) {
 $requestToken = $oauthClient->getRequestToken($temporaryCredentialsRequestUrl);
 $_SESSION['secret'] = $requestToken['oauth_token_secret'];
 $_SESSION['state'] = 1;
 header('Location: ' . $adminAuthorizationUrl . '?oauth_token=' . $requestToken['oauth_token']);
 exit;
 } else if ($_SESSION['state'] == 1) {
 $oauthClient->setToken($_GET['oauth_token'], $_SESSION['secret']);
 $accessToken = $oauthClient->getAccessToken($accessTokenRequestUrl);
 $_SESSION['state'] = 2;
 $_SESSION['token'] = $accessToken['oauth_token'];
 $_SESSION['secret'] = $accessToken['oauth_token_secret'];
 header('Location: ' . $callbackUrl);
 exit;
 } else {
 $oauthClient->setToken($_SESSION['token'], $_SESSION['secret']);

$resourceUrl = "$apiUrl/customers";
 $oauthClient->fetch($resourceUrl, array(), 'GET', array('Content-Type' => 'application/json'));
// print_r($_SESSION);
// die();
 echo $oauthClient->getLastResponse();
 }
} catch (OAuthException $e) {
 print_r($e->getMessage());
 echo "<br/>";
 print_r($e->lastResponse);
}
This should first ask you to authorise , proceed and accept the request and if all goes well you should now have a list of customers in JSON format, if you don’t want JSON then replace the fetch with
$oauthClient->fetch($resourceUrl, array(), 'GET', array('Accept' => 'text/xml'));
If you’ve got this far your now ready to extend the API, If you get any other response check that you have assigned the role properly and everywhere there is a resource dropdown it’s set to ALL. I’m not going to cover how to do this in a browser as well as Magento provides a guide on this , follow the guide you can get the access token/secret by uncommenting the two lines in the above script:
// print_r($_SESSION);
// die();
Assuming you’ve set up the access and oauth correctly, (note incorrect oauth set up may look like it’s working when it isn’t!).
Let’s create a custom call for managing customer groups, create the following structure:
app/code/local/Custom
app/code/local/Custom/Restapi
app/code/local/Custom/Restapi/Groups
app/code/local/Custom/Restapi/Groups/Model
app/code/local/Custom/Restapi/Groups/Model/Api2
app/code/local/Custom/Restapi/Groups/Model/Api2/Group
app/code/local/Custom/Restapi/Groups/Model/Api2/Group/Rest
app/code/local/Custom/Restapi/Groups/Model/Api2/Group/Rest/Admin
app/code/local/Custom/Restapi/Groups/Model/Api2/Group/Rest/Admin/V1.php
app/code/local/Custom/Restapi/Groups/etc
app/code/local/Custom/Restapi/Groups/etc/api2.xml
app/code/local/Custom/Restapi/Groups/etc/config.xml
Enable our extension, create the following file
app/etc/modules/Custom_Restapi_Groups.xml
<config>
    <modules>
        <Custom_Restapi_Groups>
            <active>true</active>
            <codePool>local</codePool>
        </Custom_Restapi_Groups>
    </modules>
</config>
Set up the config.xml
<?xml version="1.0"?>
<config>
    <modules>
        <Custom_Restapi_Groups>
            <version>0.1.0.0</version>
        </Custom_Restapi_Groups>
    </modules>
    <global>
        <models>
           <groups>
                <class>Custom_Restapi_Groups_Model</class>
            </groups>
        </models>

    </global>
</config>
set up the api2.xml
<?xml version="1.0"?>
<config>
    <api2>
        <resource_groups>
            <catalog translate="title" module="api2">
                <title>Catalog</title>
                <sort_order>10</sort_order>
            </catalog>
        </resource_groups>
        <resources>
            <groups translate="title" module="api2">
                <group>catalog</group>
                <model>groups/api2_group</model>
                <title>Groups</title>
                <sort_order>10</sort_order>
                <privileges>
                    <admin>
                        <retrieve>1</retrieve>
                        <create>1</create>
                              <update>1</update>
                              <delete>1</delete>
                    </admin>

                </privileges>
                <attributes>

                    <name>Name</name>
                </attributes>

                <routes>
                    <route_entity>
                        <route>/groups/group/:id</route>
                        <action_type>entity</action_type>
                    </route_entity>
                    <route_collection>
                        <route>/groups/</route>
                        <action_type>collection</action_type>
                    </route_collection>

                </routes>

                <versions>1</versions>
            </groups>
        </resources>
    </api2>
</config>
Here the resource groups refer to which group it appears in the backend role configuration in the admin, it’s title and sort order and the privileges available, The attributes section is important for when your using POST if you do not specify the variables your posting you will get an error 400 bad request.
Finally we define our routes another important note here is when using PUT/POST you need to use the action_type collection as certain methods are only available to the collection type, if you unsure or trying to replicate how the default api works have a look in the api2.xml of the module for example this is the same as /app/code/core/Mage/Customer/etc/api2.xml
 <routes>
                    <route_entity>
                        <route>/customers/:id</route>
                        <action_type>entity</action_type>
                    </route_entity>
                    <route_collection>
                        <route>/customers</route>
                        <action_type>collection</action_type>
                    </route_collection>
                </routes>
Now that’s set up lets populate our model in V1.php
<?php
class Custom_Restapi_Groups_Model_Api2_Group_Rest_Admin_V1 extends Mage_Api2_Model_Resource
{

    /**
     * Create a customer group
     * @return array
     */

    public function _create() {
        //Create Customer Group
        $requestData = $this->getRequest()->getBodyParams();
        $groupName = $requestData['name'];
        Mage::getSingleton('customer/group')->setData(
            array('customer_group_code' => $groupName,'tax_class_id' => 3))
            ->save();

        $targetGroup = Mage::getSingleton('customer/group');
        $groupId = $targetGroup->load($groupName, 'customer_group_code')->getId();

        if($groupId) {
            $json = array('id' => $groupId);
            echo json_encode($json);
            exit();
        }

    }

     /**
     * Retrieve a group name by ID
     * @return string
     */

    public function _retrieve()
    {
        //retrieve a group name by ID
        $customerGroupId = $this->getRequest()->getParam('id');
        $groupname = Mage::getModel('customer/group')->load($customerGroupId)->getCustomerGroupCode();

        return $groupname;

    }

}
?>
Now we have our extension completed let’s try it out in a test, create the file groupInsert.php in the tests folder as before replace mydomain and the keys..
<?php

require '../app/Mage.php'; //Path to Magento
Mage::app();

// $callbackUrl is a path to your file with OAuth authentication example for the Admin user
$callbackUrl = "http://mydomain.com/tests/index.php";
$temporaryCredentialsRequestUrl = "http://mydomain.com/oauth/initiate?oauth_callback=" . urlencode($callbackUrl);
$adminAuthorizationUrl = 'http://mydomain.com/admin/oauth_authorize';
$accessTokenRequestUrl = 'http://mydomain.com/oauth/token';
$apiUrl = 'http://mydomain.com/api/rest';
$consumerKey = 'CONSUMER_KEY';
$consumerSecret = 'CONSUMER_SECRET';
session_start();
if (!isset($_GET['oauth_token']) && isset($_SESSION['state']) && $_SESSION['state'] == 1) {
    $_SESSION['state'] = 0;
}
try {
    $authType = ($_SESSION['state'] == 2) ? OAUTH_AUTH_TYPE_AUTHORIZATION : OAUTH_AUTH_TYPE_URI;
    $oauthClient = new OAuth($consumerKey, $consumerSecret, OAUTH_SIG_METHOD_HMACSHA1, $authType);
    $oauthClient->enableDebug();

    if (!isset($_GET['oauth_token']) && !$_SESSION['state']) {
        $requestToken = $oauthClient->getRequestToken($temporaryCredentialsRequestUrl);
        $_SESSION['secret'] = $requestToken['oauth_token_secret'];
        $_SESSION['state'] = 1;
        header('Location: ' . $adminAuthorizationUrl . '?oauth_token=' . $requestToken['oauth_token']);
        exit;
    } else if ($_SESSION['state'] == 1) {
        $oauthClient->setToken($_GET['oauth_token'], $_SESSION['secret']);
        $accessToken = $oauthClient->getAccessToken($accessTokenRequestUrl);
        $_SESSION['state'] = 2;
        $_SESSION['token'] = $accessToken['oauth_token'];
        $_SESSION['secret'] = $accessToken['oauth_token_secret'];
        header('Location: ' . $callbackUrl);
        exit;
    } else {
        $oauthClient->setToken($_SESSION['token'], $_SESSION['secret']);
        $resourceUrl = "$apiUrl/groups/";
        $productData = Mage::helper('core')->jsonEncode(array(
            'name'      => 'test_group'
        ));
        $headers = array('Content-Type' => 'application/json');
        $oauthClient->fetch($resourceUrl, $productData, 'POST', array('Content-Type' => 'application/json'));
        echo $oauthClient->getLastResponse();
    }
} catch (OAuthException $e) {
    print_r($e);
}
Run this file in your browser and you should get a JSON response with the name and ID, likewise we can get the group ID from a name by replacing $resourceURL and $oauthClient with the following:
 $resourceUrl = "$apiUrl/groups/group/1";
 $oauthClient->fetch($resourceUrl, array(), 'GET', array('Content-Type' => 'application/json'));
That’s it, you’ve now extended the API! If you want to use the other methods for example to GET all groups you will need to write the various functions, check your exception log to see what function is required as you will get an error similar to:
#0 /var/www/website/app/code/core/Mage/Api2/Model/Resource.php(301): Mage_Api2_Model_Resource->_critical('Resource method...')
#1 /var/www/website/app/code/core/Mage/Api2/Model/Resource.php(251): Mage_Api2_Model_Resource->_errorIfMethodNotExist('_update')
#2 /var/www/website/app/code/core/Mage/Api2/Model/Dispatcher.php(74): Mage_Api2_Model_Resource->dispatch()
Then simply add this to your class , monitor the exception log for other errors too, sometimes I would receive the error
exception 'Mage_Api2_Exception' with message 'oauth_problem=token_rejected' in /var/www/website/app/code/core/Mage/Api2/Model/Auth/Adapter/Oauth.php:61
When I didn’t have the correct attribute set up or something else was wrong event though the token was valid, the other errors your likely to encounter
exception 'Mage_Api2_Exception' with message 'Decoding error.'
The input here is wrong check your JSON/XML formatting
exception 'Mage_Api2_Exception' with message 'The request data is invalid.'
Did you add the correct attribute?
exception 'Mage_Api2_Exception' with message 'Resource data pre-validation error.'
The data is not in the expected format, for example if your trying to populate a multi-select attribute this needs to be in an array with the correct ID’s
Please do get in touch if you have anything to add to my example or i’ve missed something or alternatively if you would like your own API developed or help writing one.
The main things I’ve found on upgrading:
Form Keys
Form keys are required on all the forms so in update cart,login,register etc…
<?php echo $this->getBlockHtml('formkey'); ?>
Checkout SSL
If your on Nginx and have the redirect issue using SSL it’s because you forgot to add this in index.php
if( isset($_SERVER['HTTP_X_FORWARDED_PROTO']) ) {
 if ($_SERVER['HTTP_X_FORWARDED_PROTO'] == 'https') {
 $_SERVER['HTTPS'] = 'on';
 $_SERVER['SERVER_PORT'] = 443;
 }
}
Custom templates not loading
Make sure they are surrounded by the <cms> tag in your config.xml
<config>
 <global>
 <cms>
 <layouts>
 <new_template1>
Passwords disappearing
I had to enter all the configuration password info again e.g for Mandrill, Fishpig wordress, centinel 3ds etc.. Not sure if that’s because of the way I upgraded
Payment Gateways
Even re-entering and saving the data did not work here , I had to delete all data > save and then re-enter the data.
Review step not place order not working
Make sure your template looks like this
review = new Review('<?php echo $this->getUrl('checkout/onepage/saveOrder', array('form_key' => Mage::getSingleton('core/session')->getFormKey())) ?>', '<?php echo $this->getUrl('checkout/onepage/success') ?>', $('checkout-agreements'));
I’m not sure if i’m missing a setting somewhere but it appears to me that in the UK version e.g if you have Website Payments Pro Payflow Edition (Includes Express Checkout) enabled, this does not skip the review step as per the 1.9 update suggests.
You can find the setting in /app/code/core/Mage/Paypal/etc/config.xml
By default it is set to 1
<skip_order_review_step>1</skip_order_review_step>
and in /app/code/core/Mage/Paypal/Controller/Express/Abstract.php around lines 194 it checks for this parameter.
if ($this->_checkout->canSkipOrderReviewStep()) {
$this->_forward('placeOrder');
} else {
$this->_forward('placeOrder'); // skip review steps for all checkouts
// $this->_redirect('*/*/review'); // default
}
The only possible thought is that I am using the crius skip step 1 and that is changing the name of the checkout. I haven’t the time to debug fully at the moment.
 public function canSkipOrderReviewStep()
    {
        $isOnepageCheckout = !$this->_quote->getPayment()
            ->getAdditionalInformation(Mage_Paypal_Model_Express_Checkout::PAYMENT_INFO_BUTTON);
        return $this->_config->isOrderReviewStepDisabled() && $isOnepageCheckout;
    }
As the functions only check is for the config.php function isOrderReviewStepDisabled() which in turn checks the configuration value, which we hope is set to 1. So as a quick hack I commented out the review and changed it to placeorder as above.
Kind of annoying that they didn’t include this as a configurable option from the admin area and that it does not seem to work in the UK versions. Anyways that’s how to get rid of the place order/review step in 1.9.
If your using 3ds centinel then you also need this:
in review/info.phtml to auto place the order after the customer successfully completes the 3ds secure authentication
<?php
$centinel = Mage::getSingleton('centinel/service');

if($centinel->isAuthenticateSuccessful()==1) {?>
review.save();
<? }
?>
One part of Magento that performs particularly poorly on Mobiles is the use of tables mainly because there just isn’t enough room to see everything in a legible manner.
Some clever people have invented ways to overcome this through scrolling tables http://zurb.com/playground/responsive-tables or http://elvery.net/demo/responsive-tables/ but for ecommerce I don’t think it works well as the information often important information is hidden without scrolling the table.
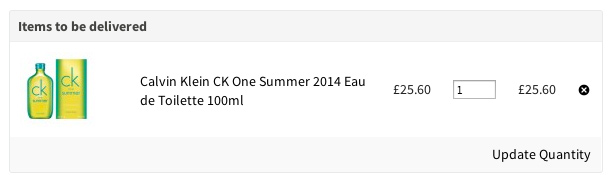
For example on the cart table you typically would get something like this
Which on mobile looks like this

I find it’s easier to have a hidden alternative layout for mobile

[code]
@media screen and (max-width: 800px) {
#shopping-cart-table {
display:none;
}
#shopping-cart-mobile {
display:block;
}
}
[/code]
This is only shown at the breakpoint you define in my example 800px at the same time hiding the normal table output.
This method does create extra markup though and a more organised approach might be to have a separate theme but this would rely on sniffing out the user agent and has the expense of keeping another theme up to date with any changes.
Perhaps the best solution is to ditch the table markup all together for DL’s, I would like to hear your thoughts.
More often than not you should probably stay clear of implementing varnish in Magento until you’ve exhausted all other options. It seems like the Holy Grail in terms of performance and will literally make your site fly, the problem is Magento is a complicated beast and any extension you use that claims a quick integration with Magento couldn’t be further from the truth! (unless of course your using a stock site, unmodified.) It’s likely you will need a ton of customisation and debugging to any of the Varnish plugins you can buy off the shelf. Not only that you will need to set up additional servers, learn how to debug varnish and it’s various admin tools and generally spend a lot of time getting it to work properly.
Turpentine offers the most reliable product from the one’s I tested but with limited documentation and help your going to struggle to get it set up correctly. The official Varnish Pagecache extension from the makers of Varnish isn’t much better, with a number of unfixed bugs and generally poor documentation, but before getting into all that you should really consider your options on improving the site speed without the use of Varnish.
Firstly set a benchmark for how your site is now, go over to http://tools.pingdom.com/fpt/ and record the speed of the homepage, category pages etc as you make each change you can run the tests again to track your progress
Most browsers now support HTML5’s new app cache, a cache on the users browser but browser already do that right? Yes they do – However AppCache works differently in that it’s designed for Apps where the user isn’t always online and in doing so when a cache is created on the clients side and when a page is loaded, cached resources are loaded directly from the cache, no connections to the live site, no checking if there’s a newer version – a big speed increase.
However there’s some downsides to using this approach on how the cache expires and clearing it, rather than re-iterate a very good explanation can be found on http://alistapart.com/article/application-cache-is-a-douchebag. I’m working on a module for Magento the makes use of AppCache if you have any thoughts please leave a comment.
Apache users can achieve quite a performance boost from tweaking the configuration:
<Directory />
Options FollowSymLinks
AllowOverride None
</Directory>
You can find more about some of the settings here http://httpd.apache.org/docs/2.2/misc/perf-tuning.html
Nginx uses much less resources as it works a bit differently from Apache, if your already familiar with Apache and don’t have the time to learn how to use Nginx it’s probably best to take it as far as you can with Apache before considering this option, if you already use it then it works pretty well out of the box. What you might need though is some extra configuration settings there’s a guide here on that.
Make sure you install php-fpm if your running nginx.
apt-get install php5-fpm
In most cases the above configuration can be left as is in nginx, if your using port 9000, you will want to edit the php-fpm configuration usually www.conf found in:
/etc/php5/fpm/pool.d/
Change the user and group to match that of your nginx installation as default this is www-data
; Unix user/group of processes
; Note: The user is mandatory. If the group is not set, the default user's group
;       will be used.
user = www-data
group = www-data
There are three different ways of running php-fpm and that is ondemand,dynamic or static I won’t go into the detail of these, but i’ve found ondemand to work better for Magento which basically runs as many process’s as is required up to a maximum rather than fixing a certain amount to be running all the time. It’s worth noting here you can enable a status page that gives you some information about what’s going on.
pm.status_path = /status
In your php-fpm uncomment this line, you can then visit website.com/status to get an output, there’s a great tutorial on using php-fpm status page here.
There’s many guides out there on mysql and I make no claims to be an expert these settings have helped
skip-name-resolve
log_slow_queries       = /var/log/mysql/mysql-slow.log
If your mysql is listening locally e.g bind-address in my.cnf says localhost or 127.0.0.1 etc then you don’t need to resolve the name , this will avoid any delay from the DNS.
The rest of your config should be configured as per the report from mysqltuner, if that’s new to you check out this post on how to use it.
I have recently come across Redis It’s an extremely fast cache storage engine and works seamlessly with Magento, it does require some server configuration but I would say this is one of the easiest to configure and get up and running quickly. There’s also support for sessions via Redis Sessions have not tried this yet but also looks very solid as of CE 1.8 Redis comes part of the default install so it’s as simple as configuring it via the local.xml if you want to find out more there’s some benchmark information here and a guide to using Magento with Redis on the Magento Site.
Review coming soon on this.
Install it onto your server
sudo apt-get install php-apc
sudo service apache2 restart
Whilst it’s installing make a note of the version, we will need this later to tweak the settings e.g
Get:1 http://uk.archive.ubuntu.com/ubuntu/ precise/universe php-apc i386 3.1.7-1 [79.2 kB]
Enable it via/magento/app/etc/local.xml and add the following lines (note if you have more than one Magento Install on the same server make sure the prefix is unique for each one)
<global>
        ...
        <cache>
            <backend>apc</backend>
            <prefix>alphanumeric</prefix>
        </cache>
        ...
</global>
Tweaking APC couldn’t be easier, first check what version is installed (as noted earlier) download and browse the archive which matches on http://pecl.php.net/package/APC
Inside there will be a file called apc.php , you need to put this somewhere that is served by Apache or Nginx ideally on a password protected area of your site.
What you want to achieve here is a high Hit ratio and little fragmentation, usually this happens because there is not enough memory allocated to APC. You can alter this setting by changing the config file in /etc/php5/conf.d/apc.ini or wherever your php install is located until you achieve the desired result.
it should look something like this:
extension=apc.so
apc.enabled=1
apc.shm_size=500M
apc.max_file_size=3M
apc.enable_cli=1
shm_size
The maximum amount of memory APC can use, one it runs out it has to purge cached items which leads to fragmentation.
max_file_size
The maximum file size that can be cached by APC, this defaults to a low value and I would recommend changing this to 3M or 5M.
There’s a decent guide here on installing Memcache once you’ve done that follow this guide on enabling it in Magento
This is generally a good idea for failover, and that’s to have a separate MySQL and Web Server, this takes the load off one server and allows you to upscale each individually. Ideally if you have enough traffic also separate out the SOLR instance. Splitting the connection between mysql and your web server can have negative effect though depending on the connection between each you will need a gigabit connection to remove network latency so if you haven’t got much load coming from apache/nginx then it’s probably not worth it.
This can be installed server side on Apache as a module or Nginx (Nginx requires a re-build) , this allows you to do a lot of optimisation on the fly like removing whitespace, minifying JS/CSS and even optimising images. more about Google PageSpeed
There’s a few ways to add caching that don’t involve varnish, first is that Magento comes with comprehensive caching out of the box.
There’s really only four methods available to us.
save($value, $key, $tags = array(), $lifeTime=null)
load($key)
remove($key)
clean($tags = array()
So let’s add something to the cache in this example we are retrieving the lowest price from a grouped product, it’s pretty intensive as it has to loop through each simple product to retrieve it’s price. The prices don’t change very often so we don’t have to do this everytime!
// load the cache
$cache = Mage::app()->getCache();

// The Code we are caching
if(!$cache->load($_product->getId())) {

// The cache doesn't exist
$aProductIds = $_product->getTypeInstance()->getChildrenIds($_product->getId());
                                    $prices = array();
                                    foreach ($aProductIds as $ids) {
                                        foreach ($ids as $id) {

                                            $aProduct = Mage::getModel('catalog/product')->load($id);
                                            if($aProduct->isSaleable()) {
                                            $prices[] = $aProduct->getPriceModel()->getPrice($aProduct);
                                            }
                                        }
                                    }
                                    asort($prices);
                                    $prices = array_shift($prices);
                                    $grouped_price = $helper->currency($prices,true,false);
// save
$cache->save($grouped_price, $_product->getId(), array("grouped_prices"), 3600);
} else {

// load the saved price
$grouped_price = $cache->load($_product->getId());

}

echo $grouped_price;
So in the above block we are:
If you don’t set a lifetime value then the item would be cached until it’s removed manually, to remove this value earlier than 1 hour we would do so by using remove
$cache->remove($_product->getId());
We can also remove by the tag if for instance you wanted to clear the cache for all grouped product prices you can use clean.
$cache->clean(array("grouped_prices"));
This builds on the default caching system but really only offers convenience and an admin section allowing you to clear the cache for individual items. check it out here
Gordon Lesti wrote his own FPC for Magento, it’s easy to install follow the guide on using it, although this suffers from the same problems as using Varnish if you have custom blocks you will need to configure them for the site to work properly. However it does not require additional servers or software so it cuts a lot of set up time.
Do you know of any other ways to speed up Magento?, get in touch.
Recently came across this module, that offers a lot of optimisations based on recommendations from Ecommerce devs
https://github.com/quafzi/magento-performance-tweaks
One thing I had to disable on this particular module is the CMS block caching if for example like me you are using it to load a template that changes for each product category. It’s well commented so it’s easy to see the particular changes that might affect your site.
It’s straight forward to add affiliate window into Magento, there are a few extensions but you don’t need them.
Edit your checkout success page which would usually be in app/design/frontend/yourpackage/yourtheme/checkout/success.phtml
Add near the top inside the php tags
// get the order
$order = Mage::getModel('sales/order')->loadByIncrementId($this->getOrderId());
// get the total
$total = $order->getGrandTotal();
// get order data
$_totalData = $order->getData();
// helper for the price formatting
$helper = Mage::helper('core');
Then add anywhere in html part of the page (replace MERCHANT_ID with your merchant ID). I’ve omitted the Category here as it’s optional
<!-- Image Pixel Tracking - Mandatory -->
    <img src="https://www.awin1.com/sread.img?tt=ns&tv=2&merchant=MERCHANT_ID&amount=<?php echo $helper->currency($order->getGrandTotal(),false,false); ?>&cr=<?php echo $_totalData['order_currency_code']; ?>&ref=<?php echo $this->getOrderId() ?>&parts=default:<?php echo $helper->currency($order->getGrandTotal(),false,false); ?>&vc=<?php echo $_totalData['coupon_code']; ?>&ch=aw&testmode=0&cr=<?php echo $_totalData['order_currency_code']; ?>" />

    <form style="display:none;" name="aw_basket_form">
        <textarea wrap="physical" id="aw_basket">
            <?php

            $items = $order->getAllItems();

            foreach ($items as $item) {

                echo "AW:P|MERCHANT_ID|".$this->getOrderId()."|".$item->getProductId()."|".$item->getName()."|".$helper->currency($item->getPrice(),false,false)."|".$item->getQtyToInvoice()."|".$item->getSku()."|default|";

            }

            ?>
        </textarea>
    </form>
    <!-- Javascript Tracking - Mandatory -->
    <script type="text/javascript">
        //<![CDATA[
        /*** Do not change ***/
        var AWIN = {};
        AWIN.Tracking = {};
        AWIN.Tracking.Sale = {};

        /*** Set your transaction parameters ***/
        AWIN.Tracking.Sale.amount = '<?php echo $helper->currency($order->getGrandTotal(),false,false); ?>';
        AWIN.Tracking.Sale.currency = '<?php echo $_totalData['order_currency_code']; ?>';
        AWIN.Tracking.Sale.orderRef = '<?php echo $this->getOrderId() ?>';
        AWIN.Tracking.Sale.parts = 'default:<?php echo $helper->currency($order->getGrandTotal(),false,false); ?>';
        AWIN.Tracking.Sale.voucher = '<?php echo $_totalData['coupon_code']; ?>';
        AWIN.Tracking.Sale.test = '0';
        AWIN.Tracking.Sale.channel = 'aw';
        //]]>
    </script>
Finally in your footer app/design/frontend/yourpackage/yourtheme/page/html/footer.phtml
<script src="https://www.dwin1.com/5715.js" type="text/javascript" defer="defer"></script>
For a quick and dirty way of doing this, you can modify the viewAction() on the product controller tested in 1.7,1.8,.19
Make a copy of
app/code/core/Mage/Catalog/controllers/ProductController.php
and place it in
app/code/local/Mage/Catalog/controllers/ProductController.php
Modify the viewAction() after this section:
// Prepare helper and params
 $viewHelper = Mage::helper('catalog/product_view');

$params = new Varien_Object();
 $params->setCategoryId($categoryId);
 $params->setSpecifyOptions($specifyOptions);
Add the following:
// Does the product have a parent product?
 $p = Mage::getModel('catalog/product_type_grouped')->getParentIdsByChild($productId);

if(!empty($p)) {

// redirect to parent

$prod = Mage::helper('catalog/product')->getProduct($p[0], null, null);
 header('HTTP/1.1 301 Moved Permanently');
 header('Location: '.$prod->getData('url_path'));
 exit;

 }
This will give you a 301 redirect to the parent.
Any developer working with php and MySQL will have come across this issue whilst developing.
And often the problem doesn’t rear it’s ugly head until after you’ve captured a lot of data.
If your getting strange characters in your database like question marks and , then follow this simple guide to check each part is set to UTF8.
UT8 is best practice for handling all types of characters and that’s the charset we will be using.
If your just trying to retrieve the unreadable data then see a solution at the bottom of this post.
First let’s check the MySQL server, open up your favourite GUI like MySQL Tools or via command line and run:
SHOW SESSION VARIABLES LIKE 'character_set%';

The important parts to notice here
These should all be utf8 , if they aren’t then you need configure your database to use utf8.
You can reverse engineer your table using
SHOW CREATE TABLE table_name;
At the very end you will see “DEFAULT CHARSET=charset” change this to utf8.
As further final checks run
show variables like "collation_database";
This should show ‘utf8_general_ci’
And you can check each column individually like so.
SHOW FULL COLUMNS FROM table_name;
All connections to MySQL need to use utf8, you can do this by using SET NAMES.
For PDO connections you can either include this in the SQL statement before “SET NAMES UTF8;” or you can include it in the connection e.g
$pdo = new PDO('mysql:host=myhost.com;dbname=db_name', 'db_user', 'db_password',array(PDO::MYSQL_ATTR_INIT_COMMAND => "SET NAMES utf8");
For standard mysqli connections use:
$mysqli->set_charset("utf8");
It’s important you place that straight after the connection before any queries are run.
Thankfully there is a way to retrieve data that might otherwise look garbled in php you can use:
//ISO code for most browsers default encoding

mb_convert_encoding($text, "ISO-8859-1")
Note that you must connect to the DB the way you where doing before you fixed any issues. If you try and retrieve data using SET NAME utf8 then the above will not work as your requesting the data in a different format.
ISO-8859-1 is the character encoding used for most browsers, however there are others so this may not work in every case.
If you have a setup which includes one of the rackspace cloud load balancers you will notice that in apache or php the ip of the client is the load balancers, the easiest way to fix this is install an apache module called mod_rpaf.
Check which version of apache your running
apache2 -l
The output here tells me i’m using the perfork module.
Compiled in modules:
  core.c
  mod_log_config.c
  mod_logio.c
  prefork.c
  http_core.c
  mod_so.c
Install the prefork development tools
apt-get install apache2-prefork-dev
The alternative here is to install apache2-threaded-dev if you see threaded instead of prefork.c
Download the mod_rpaf module and extract the latest version to check the latest see http://stderr.net/apache/rpaf/download/
wget http://stderr.net/apache/rpaf/download/mod_rpaf-0.6.tar.gz
tar -xzf mod_rpaf-0.6.tar.gz
Install and compile the apache module
cd apache-2.2-mod_remoteip.c
apxs2 -i -c -n mod_rpaf-2.0.so mod_rpaf-2.0.c
The script will compile and install the module giving you the output of the path to the module e.g
/usr/lib/apache2/modules/mod_rpaf-2.0.so
Make a new config file for rpaf and edit
touch /etc/apache2/conf.d/rpaf.conf
nano /etc/apache2/conf.d/rpaf.conf
Enter the following details in rpaf.conf, change 10.000.000.0 to your load balancer IP comma seperate for more than one
# Your module path
LoadModule rpaf_module /usr/lib/apache2/modules/mod_rpaf-2.0.so


RPAFenable On
RPAFsethostname On
# Your loadbalancer IP seperate with a space for more than one
RPAFproxy_ips 10.000.000.0
RPAFheader X-CLUSTER-CLIENT-IP
service apache2 reload
If you see any errors here check your configuration.
service apache2 restart
You should then see the correct user ip showing up in $_SERVER[‘REMOTE_ADDR’] for php
Update:
If your looking to restrict access from .htaccess this still doesn’t give apache the correct IP to do that you simply use a pre configured environment variable:
order deny,allow
deny from all
allow from env=allowclient
SetEnvIf X-Cluster-Client-Ip 000.000.000.000 allowclient